Sunday, 6 April 2014

Padded Table Runner

Hi folks

I bought a selection of pretty fabrics in Frome a while ago and have been unsure what to do with them. I had half an idea of trying a kind of 'cheat's patchwork' but in the end decided to have a go at sewing together simple alternating strips. I've got quite a bit of it - two sets of strips are waiting to make cushion covers for some bench seats - but I had enough left over to do something with and decided to make a padded, heat-proof table runner. 


Here's how it went ...

... I first cut the fabric into strips of the same width, then sewed them all together, alternating the patterns, until I had a long piece like this. I turned the long edges in by 1cm and ironed in place.


I then cut out another piece of fabric (this time part of an old Ikea quilt cover) slightly larger than my strip of fabric - about 3cm larger all the way around.

(In retrospect I should have turned the ends of the strip in by 1cm too as this would have given an even border around the outside, but you live and learn!)


With the fabric right sides together, I matched the long edges together, pinned and stitched along them both, leaving a 1cm seam allowance.


I then stitched along one short edge, stopping before I got to the corners. I pulled the long pocket of fabric out the right way and pressed it flat - neatening the corners by folding them into a sort of mitre. 


Then stitched them in place by hand, making sure I didn't stitch through the back too as I still had to insert some foam padding.

I had a strip of foam that was the padding in an old ironing board cover. (I don't throw much away!) So I cut this to fit inside what was now a long fabric pocket.


Once inside, I put a few pins across and down the runner to hold the foam in place.


Then I took a deep breath and started quilting through the whole lot with the machine, creating a simple wave pattern from one end to the other. 


I'd never done this before so it was a bit wobbly at times but great fun and will certainly do the job of holding the layers together.  


To neaten the look, I stitched closely to the inside edge of the border fabric. One end was still open so I trimmed up the foam, folded in the hems and stitched across to finish it off - doing the same to the corners as I had before.


Finally, ironed on both sides, the runner is ready to go!


My new motto is 'don't let lack of experience or skill stop you from having a go'!


Sunday, 5 January 2014

Fabulous Facebook Necklace Giveaway

Hi folks
Well, I promised a giveaway when I reached 50 Likes on my Facebook page and now we've reached 50 and gone beyond. As a thank you to all those who follow me I'm giving away this beautiful 1950s emerald green necklace. Pop to the bottom of this posting to see how to win!


The light and dark green stones are prong set in a gold-tone setting and hang from a 15 1/2 inch chain. 


I think that it would look great worn in the evening but it would also look fabulous with a simple shirt or little cardigan during the daytime.

If you want to have a chance of winning just Like my Facebook page (if you haven't already) and leave a Comment under the Necklace Giveaway posting. We'll be putting all the names into a hat and Mr T will draw the winner on Wednesday evening at 8.00pm. Don't forget to leave a Comment on the Facebook posting though or you won't be included.

Good luck to all!

Melanie
English Rose Vintage

Sunday, 8 December 2013

Thanks

Hi folks


Been rather poorly for the last week so have been mostly sleeping with occasional spells of reading Lord Peter Wimsey or watching made for TV Christmas movies. I was planning to start getting the house ready for Christmas - the decorations are out of the loft and the living room is now cleared of all my vintage stash, so we're ready to get going. I just need a bit more energy first! Think we will pop up the road to the local garden centre for our tree this afternoon and we can slowly make a start. I expect the rest of the day will be spent snuggled on the sofa.

Thank you to all the lovely customers we had at the Frome Super Market last Sunday. We had a brilliant day and had lots of sales too. I enjoyed interacting with customers and it was interesting to see the sort of things people were looking for. We'll be back at the markets in the Spring and I should have a bigger and better collection of goodies by then too.


Take care folks!

Melanie Melanie
English Rose Vintage


Wednesday, 27 November 2013

Market Day

Hi folks!

We're definitely on for the Frome Super Market this Sunday. We had a trial run with the gazebo in our garden last weekend and I think things were looking pretty good. We planned the layout and took photos too so that we can set up more quickly on the day. It's a long time since we did a market (back in our chocolate making days) so we're really looking forward to it. 

It's a special extended market from 10am to 4pm so we'll have plenty of selling time. There are going to be a bumper number of stalls too and some interesting music during the day. Take a look at the market facebook page for a taster of what's coming. 

If you're in the area and can get to the market do pop along and see us. Anyone who mentions this blog will get a special 10% discount on our stall too.

Bye for now ...

Sunday, 10 November 2013

Frome Super Market

Hi folks!

Last Sunday we went to Frome Super Market and despite the rain we had a great time. The market is held on the first Sunday of each month and stalls are spread over the whole town. There's a wonderful flea market with vintage, antiques and collectibles, delicious food at the Artisan and Somerset Farmers markets, a general People's market and a cute Suitcase sale on Catherine Hill.


We drank steaming mugs of hot chocolate topped with cream and marshmallows from Lucille's chocolate caravan. Definitely helped to keep out the chill.


Ate amazing Salty Dog brownies from Dark Matters - absolutely scrummy!


Between showers we had a good look around the stalls in the Flea market. I'm hoping to have a stall at the market on 1 December so this was a good chance to see what I was letting myself in for!


There were some fabulous stalls there so it'll be a challenge looking half as inviting. I've been trying to figure out how to display everything and have a huge pile of stock in my sitting room waiting to be priced up. I'm going to add some colour with my collection of vintage scarves which look great hung from these covered hangers.


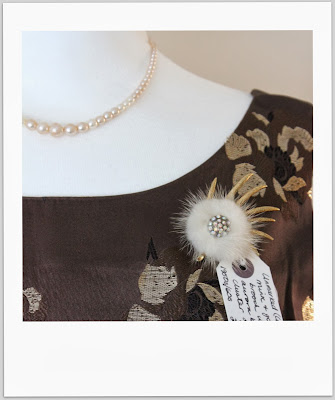
And I'm really enjoying researching everything - including this fabulous 1950s/60s brooch. I was disturbed though to discover that the fur on this is probably mink so I'll be sending any proceeds from it's sale to the RSPCA. 

I'm waiting for confirmation that I can take part so I'll give you an update as soon as possible. Have a fun week everyone!

Melanie Melanie
English Rose Vintage


Saturday, 26 October 2013

Supersized sketch pad

Hi folks! 

I'm still fiddling about in our spare room, trying to turn it into a useful and inspiring work space. This morning I decided to transform my rather dull grey plastic crafting table into a useful sketch pad and doodling spot. I don't want to run to the expense of a new table when I have a perfectly functional one already but it is a very uninspiring, if practical, plastic fold up table. Great for doing fairs and shows but not great to look at on a daily basis and hardly conducive to flights of creative fancy.


I had thought about putting a pretty cloth over it but I need this table to be practical, especially when I begin to experiment with the resin jewellery again. Resin spills on paper are easy to deal with but resin on a plastic table may well stay there for ever. So, having seen something similar in a silver-smith's work room, I thought how positively spiffy it would be to have a table covered in paper so that I could scribble notes, designs, doodles, whatever, to my heart's content and then just screw it up and recycle when I'm done!


This very simple transformation required a box of greaseproof baking paper, scissors and sticky tape. Simply stretch out the paper, tuck over each end and stick in place. Pop a few extra strips of sticky tape at intervals to prevent it moving about too much. Repeat with another strip overlapping the last one, etc., until table is perfectly covered in paper. The table is plastic so there will be no harm in sticking the greaseproof paper to it with sticky tape.


There we have it - a supersized sketch pad. 


Perfect for researching my latest treasures and taking notes as I go or scribbling ideas as they pop into my head. 

What will you be doing today?

Take care folks
Melanie Melanie


Sunday, 20 October 2013

Open for business

I got the bed. We picked it up yesterday and after a lot of huffing and swearing managed to put it together. It takes up quite a bit of the spare bedroom but as it serves as a day bed, pulls out into a double and has massive drawers for storage, it's going to prove a really useful bit of furniture. It's a perfect lounging spot for reading and snoozing too - I've tested it already. I covered it with a quilt I made with Hawaiian fabric years ago and a couple of cushions and throws for snuggling.


The other good news is the English Rose Vintage shop is open for business again at last. Best of all, Etsy has finally rolled out the facility to accept credit card payments and Etsy Gift Cards to the UK - thanks Etsy! So now it is possible to buy an Etsy Gift Card to be used in our shop or pay for your goods by card instead of PayPal.

I mentioned before that I'd already made some great vintage discoveries for the shop since we moved. Here's a sneaky preview of my favourites. 


I was very excited when I got my hands on these beautiful petit point boxes and tray.


There are two gilt boxes with hand stitched petit point flower panels in different designs. The petit point is in lovely condition as both have been protected by their original plastic covers. The covers need a bit of a clean up to show off the stitching to best advantage so I shall be doing that before I list them.


The tray is quite beautiful, with an embroidered central panel surrounded by lace held between two pieces of glass in a gilt frame. 


Such a pretty set. Can't wait to get these in the shop, although they would look so good on my new dressing table. I must resist temptation...

I have plans for a revamp of the shop soon. I'm working on a new look including banner, avatar, etc. The plan is to use some lino cutting equipment I received as a gift to make my own design, which I will print onto business cards, postcards, tea towels, and anything else I can think of or get my hands on. My aim for this week is to transfer my first design to the lino block and cut it out. I will show you the results - even if it's a disaster!