Showing posts with label crafting. Show all posts

Tuesday, 15 July 2014

Taking a break

Hi All

We're moving house yet again - it's only been 11 months since the last move - one of the down sides of renting in this country. Anyhoo, I'm going to be taking a break from this blog and from my Etsy shop.

I've really enjoyed blogging and running the shop but lately I've had more and more demands on my time. Good things mostly - things that I'd like to concentrate on for a while. Sadly, this means that I've put my shop on vacation and won't be posting any more blogs - at least for a few months. I'll continue to sell some vintage on Ebay and plan to do a couple of car boot sales in the Trowbridge area. I'm having a huge cull of possessions so that I can start my new home with less 'stuff'!

So, I'm going to move to our new home, enjoy settling in and concentrate on yoga, music and crafts. I'll continue to post on my English Rose Vintage Facebook page so do pop over there and 'like' it and you'll continue to see what I'm up to! 

Thank you for dropping by and taking the time to read my ramblings ...

Best wishes
Melanie

Friday, 27 June 2014

Antibes Green

Hi all

I picked up an old wooden tray and an embroidered tray cloth at a junk shop in Ross on Wye the other day and thought I'd show you their transformation.

I have a tin of Annie Sloan 'Antibes Green' paint that I'm planning to revamp a display cabinet with but that's going to be a big project so in the meantime I used a little of it on this tray.


This is the tray after the first coat of chalk paint - still a bit of the wood showing through.


You don't need to do any preparation or rubbing down with this chalk paint, so I simply wiped the dirt off first. This is the tray when the second coat was drying.


I left it to dry overnight and then applied a coat of clear wax (also Annie Sloan) with a soft cloth, giving it a gentle buff to a soft shine.


This is the finished result. I'm going to leave it for a couple of days before using it to ensure it's completely dry. 


The tray cloth just needed a good soak to remove a couple of stains and it came up beautifully.


I love the embroidery on this cloth and it goes so well with the green tray.


Now I'm putting together a tea set to go with it - I have the teapot and milk jug so just need to find some cups and saucers!

Sunday, 6 April 2014

Padded Table Runner

Hi folks

I bought a selection of pretty fabrics in Frome a while ago and have been unsure what to do with them. I had half an idea of trying a kind of 'cheat's patchwork' but in the end decided to have a go at sewing together simple alternating strips. I've got quite a bit of it - two sets of strips are waiting to make cushion covers for some bench seats - but I had enough left over to do something with and decided to make a padded, heat-proof table runner. 


Here's how it went ...

... I first cut the fabric into strips of the same width, then sewed them all together, alternating the patterns, until I had a long piece like this. I turned the long edges in by 1cm and ironed in place.


I then cut out another piece of fabric (this time part of an old Ikea quilt cover) slightly larger than my strip of fabric - about 3cm larger all the way around.

(In retrospect I should have turned the ends of the strip in by 1cm too as this would have given an even border around the outside, but you live and learn!)


With the fabric right sides together, I matched the long edges together, pinned and stitched along them both, leaving a 1cm seam allowance.


I then stitched along one short edge, stopping before I got to the corners. I pulled the long pocket of fabric out the right way and pressed it flat - neatening the corners by folding them into a sort of mitre. 


Then stitched them in place by hand, making sure I didn't stitch through the back too as I still had to insert some foam padding.

I had a strip of foam that was the padding in an old ironing board cover. (I don't throw much away!) So I cut this to fit inside what was now a long fabric pocket.


Once inside, I put a few pins across and down the runner to hold the foam in place.


Then I took a deep breath and started quilting through the whole lot with the machine, creating a simple wave pattern from one end to the other. 


I'd never done this before so it was a bit wobbly at times but great fun and will certainly do the job of holding the layers together.  


To neaten the look, I stitched closely to the inside edge of the border fabric. One end was still open so I trimmed up the foam, folded in the hems and stitched across to finish it off - doing the same to the corners as I had before.


Finally, ironed on both sides, the runner is ready to go!


My new motto is 'don't let lack of experience or skill stop you from having a go'!


Saturday, 26 October 2013

Supersized sketch pad

Hi folks! 

I'm still fiddling about in our spare room, trying to turn it into a useful and inspiring work space. This morning I decided to transform my rather dull grey plastic crafting table into a useful sketch pad and doodling spot. I don't want to run to the expense of a new table when I have a perfectly functional one already but it is a very uninspiring, if practical, plastic fold up table. Great for doing fairs and shows but not great to look at on a daily basis and hardly conducive to flights of creative fancy.


I had thought about putting a pretty cloth over it but I need this table to be practical, especially when I begin to experiment with the resin jewellery again. Resin spills on paper are easy to deal with but resin on a plastic table may well stay there for ever. So, having seen something similar in a silver-smith's work room, I thought how positively spiffy it would be to have a table covered in paper so that I could scribble notes, designs, doodles, whatever, to my heart's content and then just screw it up and recycle when I'm done!


This very simple transformation required a box of greaseproof baking paper, scissors and sticky tape. Simply stretch out the paper, tuck over each end and stick in place. Pop a few extra strips of sticky tape at intervals to prevent it moving about too much. Repeat with another strip overlapping the last one, etc., until table is perfectly covered in paper. The table is plastic so there will be no harm in sticking the greaseproof paper to it with sticky tape.


There we have it - a supersized sketch pad. 


Perfect for researching my latest treasures and taking notes as I go or scribbling ideas as they pop into my head. 

What will you be doing today?

Take care folks
Melanie Melanie


Saturday, 13 July 2013

Victorian Calligraphy

Hi again!


I thought I would quickly share with you this Victorian (1878) legal document that I've just listed in the English Rose Vintage shop.


It's quite a beauty! Three very large pages (about 26 x 21 inches) of lovely calligraphy on vellum including signatures and various seals and stamps.


The pages are still joined at the bottom by fabric ties, held in place on the front with red wax seals. It would be relatively simple to separate the sheets so that they could be framed separately. There seems to be plenty of information online about taking creases out of vellum, although I've never tried this myself. I'd be interested to know if anyone has done this.


The document relates to a Mortgage of property in Marylebone (then in Middlesex) on behalf of Mr Frederick Mark and Messrs Constable Curtis and Frederick S Clarkson. It is for £1,500, which would have been a very considerable sum in the Victorian era. I had a lot of fun trying to find these characters online and managed to trace some information regarding the Constable Curtis family as that is such a distinctive name. There is a record of a Constable Curtis who died on 30th March 1909 at The Hall, Great Berkhamsted, Hertfordshire. He was a retired Captain of the 12th Royal Lancers and left the huge sum of c. £59,000 in his estate. I think this is the same person, as the Mortgage was witnessed by Edward Constable Curtis (Gentleman), Constable's eldest son.


A fascinating piece of history that I think would look wonderful mounted into antique frames. There are also endless possibilities for scanning the document and using this gorgeous calligraphy in crafting projects such as decoupage.


I'm planning another treasure hunt tomorrow morning so there will be no lie-in for me this Sunday! 

Whatever you're up to this weekend, have a happy time,

Saturday, 23 March 2013

Easter Favours

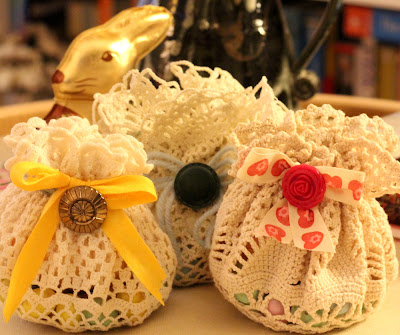
The weather outside is frightful but inside it's delightful! I decided to cheer myself up amidst this winter snap by making up some Easter favours that will soon be wending their way to my nearest and dearest. Why not try making some of these yourself? Simple to make, they will surely cheer the hearts of those you love on Easter Day.


These Easter bundles made from vintage fabrics and doilies are tied up with various buttons and bows. Fill them with your favourite Easter chocolate or other goodies!

 
Vintage doilies make lovely dolly bags by simply threading ribbon through the holes, gathering them up neatly and tying off with a lovely bow. Adding a vintage button finishes them off nicely.
 

Alternatively, cut large circles of vintage fabric with crimping shears (using a plate as a template) and tie with ribbon, raffia or lace, and more lovely buttons.
 
 
I will shortly be taking some time off work (yippee) and amidst a frenzy of Spring Cleaning (I feel one coming on) may even get a chance to do some more listing in the shop and experimenting with resin. Hope your Easter is totes amazeballs folks!
 

Saturday, 16 March 2013

Get some inspiration

Spent a very full day listing new Vintage Inspiration kits and smaller trim and button kits in the English Rose Vintage shop today. I've also begun listing a whole bunch of vintage buttons and there are more to follow very soon.

Here's a little taster of what is already in the shop. Have a lovely weekend!

Sunday, 17 February 2013

Work in progress

Gosh I've been a very poor blogger lately. I apologise for my lack of communication but much of my spare time has been taken up teaching myself how to make resin jewellery. From some uninspiring beginnings I am at last creating things that I love.


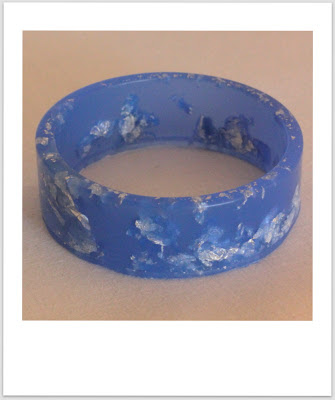
These are my latest bangles - waiting to be sanded and finished.


The clear greeny coloured one was made from a mould I bought on Etsy but the blue ones are made from my own silicone moulds made using vintage bangles.


I love this lavender blue colour and the simple shape of the bangle. I've made these using bio-resin, which is sourced as a co-product or from waste streams of other industrial processes and has a significantly reduced carbon footprint than other types of resin.


I've been experimenting with suspending real gold and silver leaf in the resin and love the results this is giving. 
 
 
I have a lot more to learn and my next challenge is to polish the rough edges to a shiny finish. By the end of the evening I hope to have something I can wear to work tomorrow!

Sunday, 20 January 2013

Happy New Year!

Well, I know there has been a bit of a hiatus in my blogging since way before Christmas so it's high time that I picked up where I left off. I hope you all had a good break, if you had one. We had a lovely long holiday at home and it was tough going back to work in January. The Etsy shop was busy with sales up to Christmas - much to my surprise - so I was kept busy wrapping and posting vintage goodies across the world. Now I need to find the time to list some more of my vintage treasures. I've got some wonderful things stashed away so more on those later.
 
In the meantime I've found myself becoming hooked on a new craft. I have plans afoot for a new Etsy shop, provided my experimentation works out ok! I'm having lots of fun but there's a lot to learn. I'll tell you more about this as we go - for now I'll just say it involves a lot of mixing, colouring and gold leaf. Such fun!
 
Hope all those in good old blighty are enjoying the snow - take care on those icy roads and pavements and remember to feed the little birdies!

Sunday, 28 October 2012

Season of Mists and Festive Sprucing

As the Autumn has descended on us, all flurries of bronzed leaves, gentle mists and surprise gusts of wind that leave my curly hair looking a bit more 'Russell Brand' than 'Pre-Raphaelite goddess', I've begun nesting and home-making like I really am about to hibernate for the winter. Bathroom and now bedroom have been given 'the treatment' (clear out junk, tidy, clean, re-arrange stuff, put up pictures - generally prettify) and this afternoon it's the living room's turn - it's the biggest and messiest room so I may need fortifying mugs of hot chocolate to get through it.
 
I'm not sure everyone gets it (everyone = the man who shares my life) but simply moving stuff around, putting up a new picture or trimming a shelf with old lace brings a fresh new perspective for me. I do like things to look attractive and I'm usually too lazy to do anything about it but occasionally I get the urge to perk things up. The coming Christmas celebrations and long break from work (yippee) always brings on a burst of enthusiastic sprucing - the thought of being at home for a long stretch is heavenly but being at home when everything's looking just a little different than normal is a feast for the eyes and feels like a true holiday in someone else's beautiful home. I'm likely to revert to my usual slovenly self for the rest of the year.
 
I've been rooting through my old box of lace trims and ribbons whilst doing all this and thought I would share this simple lampshade makeover with you.
 
 
In the bedroom I have two Ikea lampshades with barrel-shaped cream shades that I've had for many years. I like their simplicity but as I'm feeling a little more romantic and in need of 'pretty' for the winter I've given them a temporary makeover that can easily be removed or changed when I feel the need. This is the 'before' shot:
 
 
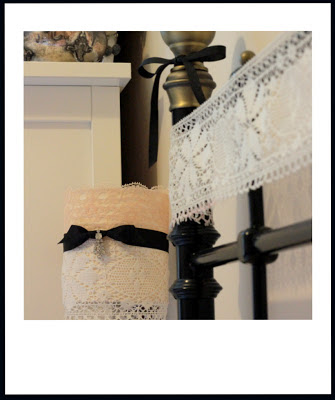
This is the after shot. (It did take a little longer than the two minutes shown on the clock - but not much - I have two shades and this is one I made earlier!)
 
 
And this is the very simple 'how to':
 
 
Using some of the large lace trim that I'd already decorated the metal frame of the bed with, I simply wrapped a strip around the middle of the shade, making sure that a little was hanging below the bottom.
 
 
I then wrapped a piece of contrasting lace around the top part of the shade, making sure that a little of the scalloped trim peaked above the top of the shade.
 
 
As these lamps sit on our bedside tables and can't be seen from behind, I have simply held the pieces of lace in place at the back with a little blue tak - no stitching or gluing needed. If you wanted to make it permanent, simply tuck in the edges to neaten and attach with small dabs of glue to the shade. With a temporary fix though you can change the look using different trims and ribbons whenever you feel like it.
 
 
To hold everything in place and create a smart finish, tie a length of ribbon (black in this case) around the join of the two pieces of lace. My ribbon was thick so I used a simple double knot but a bow would also look nice. Trim the ends of the ribbon after it has been tied and you're happy with the way it looks. Finally, I've used a pair of sparkling clip-on earrings attached to the middle of the knot to finish the lampshades off - a vintage brooch or dress clip would look good too.


Et voila! A simple change to create a more romantic and coordinated look. If you frequent car boot sales and thrift/charity shops be on the look out for plain lampshades as they can easily be given a makeover - without any technical know-how - to match your room. 
 
Happy sprucing everyone!