As the Autumn has descended on us, all flurries of bronzed leaves, gentle mists and surprise gusts of wind that leave my curly hair looking a bit more 'Russell Brand' than 'Pre-Raphaelite goddess', I've begun nesting and home-making like I really am about to hibernate for the winter. Bathroom and now bedroom have been given 'the treatment' (clear out junk, tidy, clean, re-arrange stuff, put up pictures - generally prettify) and this afternoon it's the living room's turn - it's the biggest and messiest room so I may need fortifying mugs of hot chocolate to get through it.
I'm not sure everyone gets it (everyone = the man who shares my life) but simply moving stuff around, putting up a new picture or trimming a shelf with old lace brings a fresh new perspective for me. I do like things to look attractive and I'm usually too lazy to do anything about it but occasionally I get the urge to perk things up. The coming Christmas celebrations and long break from work (yippee) always brings on a burst of enthusiastic sprucing - the thought of being at home for a long stretch is heavenly but being at home when everything's looking just a little different than normal is a feast for the eyes and feels like a true holiday in someone else's beautiful home. I'm likely to revert to my usual slovenly self for the rest of the year.
I've been rooting through my old box of lace trims and ribbons whilst doing all this and thought I would share this simple lampshade makeover with you.
In the bedroom I have two Ikea lampshades with barrel-shaped cream shades that I've had for many years. I like their simplicity but as I'm feeling a little more romantic and in need of 'pretty' for the winter I've given them a temporary makeover that can easily be removed or changed when I feel the need. This is the 'before' shot:
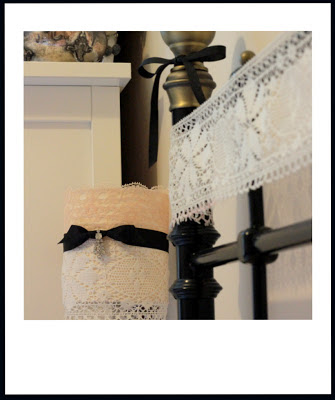
This is the after shot. (It did take a little longer than the two minutes shown on the clock - but not much - I have two shades and this is one I made earlier!)
And this is the very simple 'how to':
Using some of the large lace trim that I'd already decorated the metal frame of the bed with, I simply wrapped a strip around the middle of the shade, making sure that a little was hanging below the bottom.
I then wrapped a piece of contrasting lace around the top part of the shade, making sure that a little of the scalloped trim peaked above the top of the shade.
As these lamps sit on our bedside tables and can't be seen from behind, I have simply held the pieces of lace in place at the back with a little blue tak - no stitching or gluing needed. If you wanted to make it permanent, simply tuck in the edges to neaten and attach with small dabs of glue to the shade. With a temporary fix though you can change the look using different trims and ribbons whenever you feel like it.
To hold everything in place and create a smart finish, tie a length of ribbon (black in this case) around the join of the two pieces of lace. My ribbon was thick so I used a simple double knot but a bow would also look nice. Trim the ends of the ribbon after it has been tied and you're happy with the way it looks. Finally, I've used a pair of sparkling clip-on earrings attached to the middle of the knot to finish the lampshades off - a vintage brooch or dress clip would look good too.
Et voila! A simple change to create a more romantic and coordinated look. If you frequent car boot sales and thrift/charity shops be on the look out for plain lampshades as they can easily be given a makeover - without any technical know-how - to match your room.
Happy sprucing everyone!


No comments:
Post a Comment